Photo Advice: The Perfect Background
Having trouble getting your Uni-versal Extras profile photos accepted? This post will talk you through some of the basics and common issues relating to backgrounds. We know it can feel horrible when a photo gets turned down, but we truly want to get you on board so please read on!
Your Profile Photos are SO Important!
With the majority of people now having access to a good quality digital camera, we allow all of our extras to manage their own photos. This has helped us to keep our Listing Fees low (no need to pay for professional photos), plus there’s the added benefit of being able to manage your profile 24/7 via our website.
Unfortunately we do find that some people have difficulty taking the photos that we need for a variety of reasons. The important thing to remember here is that our guidelines are strict because the photos must represent you as a professional extra in order for you to be taken seriously and to give you the best chance of securing work.
Read on for lots of examples and guidance. Please note that we have used ‘Standard Full Body’ photos as examples because these are normally the hardest to get right in relation to backgrounds.
Finding the Perfect Background Indoors
Although is sounds simple, we find that getting the background right in photos is a common issue. Because you have to upload a ‘Standard Head & Shoulders’ photo and a ‘Standard Full Body’ photo, you’re going to need a reasonably big area to shoot your photos. In the perfect world you would use a painted white wall in your house that would provide a plain backdrop.
The main thing to remember is that the focus must be 100% on you, meaning that there can be no external elements that make it obvious to the viewer that you have taken the photo yourself, i.e. no light switches, no doorframes, no picture hooks, no light fixtures, etc. The background must be completely plain.
Don’t have a plain white wall big enough? Click here for further options.
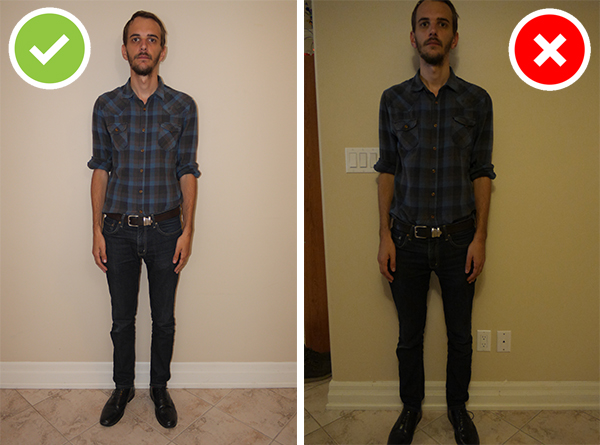
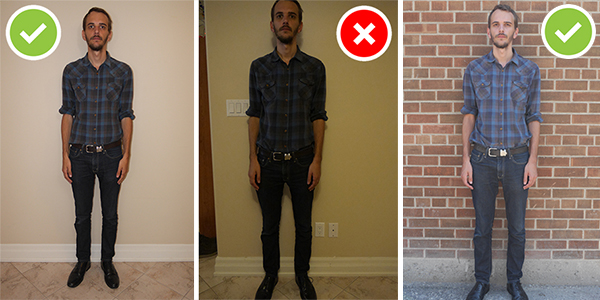
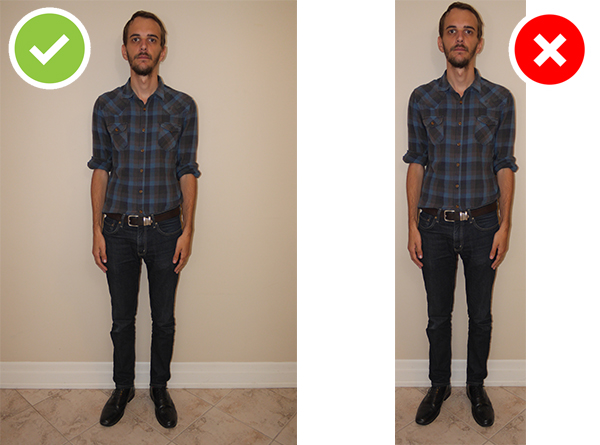
Can you spot the differences between the two examples above?
– The background must be plain without light switches, doorframes or other clutter.
– The lighting must be good, i.e. so we can clearly see your features and skin colour.
– The photo must be taken flat against a wall and not in a corner or against the edge of a wall.
– You must stand in the centre of the shot and the top of your head must not be cut off.
My Wall Isn’t Big Enough – Why Can’t I Crop My Photos?
Our website has been designed to handle photos taken with a standard width and height. If you crop a photo it immediately makes it look unprofessional and causes side affects across the site which could minimise your chances of being cast or selected because you will not be displayed at the same size as other extras on our system.
Do not edit your photos. Instead make sure that you take them properly using a digital camera and add them directly to our website.
Why Won’t You Accept Mobile Phone Photos?
Mobile phone camera technology has improved dramatically over the last few years, but it still has some way to go. We moderate photos based on their individual quality and suitability, not the device with which they were taken.
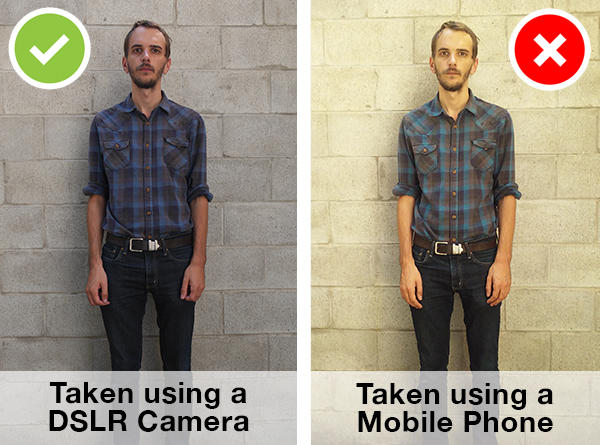
Without going into too much detail about the technology, it’s what’s actually inside a DSLR digital camera that allows it to perform better in low light or indoor situations than most mobile phones (it is not all about the number of pixels). In addition to issues with shooting in low light, there are also a multitude of other problems related to phone cameras, i.e. some take photos with an unusual aspect ratio while others apply an automatic ‘beautify’ setting or change the colours which make them look unnatural.
See the comparison below between a DSLR Camera and a high quality Mobile Phone Camera:
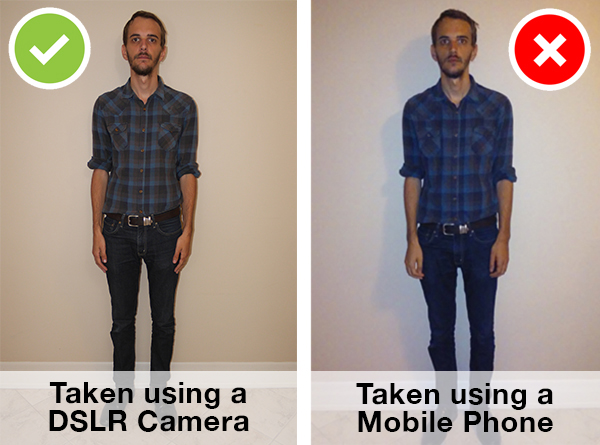
Can you spot the differences between the two indoor examples above?
– The mobile phone photo is less clear and more grainy than the DSLR image.
– The colours in the mobile phone photo are also not as varied as the DSLR image.
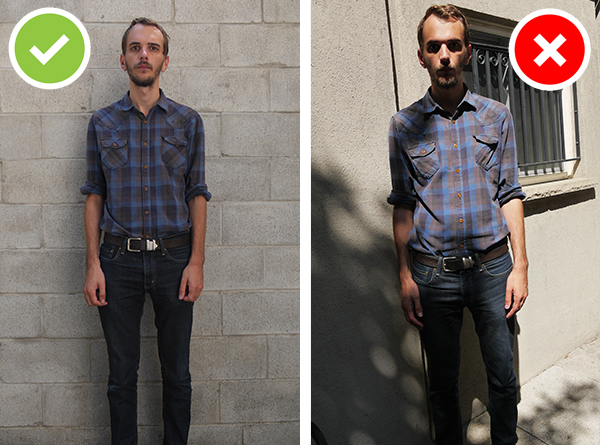
Can you spot the differences between the two outdoor examples above?
– The mobile phone camera is better when shooting outdoors but the colours are still washed out and yellow compared to the DSLR Camera, meaning that it is hard to know the real skin tone of the model (a big problem for casting).
What is the Alternative if I don’t have a White Wall?
Don’t worry, we have the answer… you can find an outdoor location to take your photos instead. We accept photos taken against plain walls, but you’ll need to take extra care when picking your location to make sure it’s suitable.
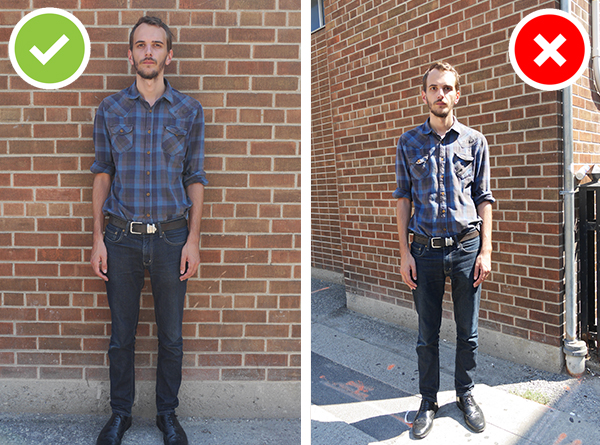
Key things to consider when taking outdoor photos:
– You don’t want any visible elements that might make it seem unprofessional like graffiti, vents, drains, weeds, drainpipes, etc.
– The wall must be clean and completely plain (patterned walls will not be accepted).
– Make sure that the lighting is consistent, i.e. there are no distracting shadows and you are not half-in half-out of the shade, etc.
– Take the photo flat against the wall, attempting the get the brick line horizontal.
– The aim is to make it so when anyone looks at the photo, the only thing that they can possibly be paying attention to is you.
Things to Remember
All photos uploaded to our website are moderated by real people. There is no prejudice of any kind when we moderate photos, we simply follow the company guidelines which are clearly set out on our website.
– Do not re-upload the same photo multiple times as it will simply be rejected again, wasting your time and our time. Instead, refer to the guidance provided and retake the photo.
– If a photo gets rejected, refer to the email you receive which will provide individual feedback relating directly to your image and why it didn’t cut the mustard.
– The quality must be sharp and not blurry.
– Your standard photos must be in full colour.
– You must wear unrestrictive plain clothing, for example a t-shirt or top.
– Make sure that the lighting is good and that there are no shadows or other distractions.
The 5 Point Rule
1. Find a suitable place to take your photos.
2. Use a DSLR Digital Camera.
3. Wear casual clothing and completely avoid any items that may restrict your features such as jackets, hats, scarfs, sunglasses, etc.
4. Keep a straight face, standing straight on and looking directly into the camera. Remember to take your photos so that they can be uploaded directly to our website without the need for any editing.
5. ‘Standard Head & Shoulders’ photos should feature you in the centre of the shot without cutting off your hair, whilst Full Body photos should show you from head-to-toe, or head-to-ankle.