Studying Student Profiles

As many of you will already know, Uni-versal Extras was started by a student to help students find work as film or TV extras. Since then we have grown, but we remain a completely free service for full-time students! In this blog, we take a look at how to get your profile complete and activated so you can start making the most of this service.
How To Get The Most From Your Student Listing
Step 1 – A Nice Complete Profile
Regular readers of the Uni-versal Extras Blog may be familiar with some of our previous blogs about how to get the most out of your profile. You can read them here:
So, as not to overload you with information we’ll focus on the Student only sections today.
Starting with ‘Section 1 – Contact Details’, of your profile.
If your College or University is not listed on the first drop-down select the closest generic. So for example, the ‘University of Bristol’ would be ‘Other Uni (South West)’.
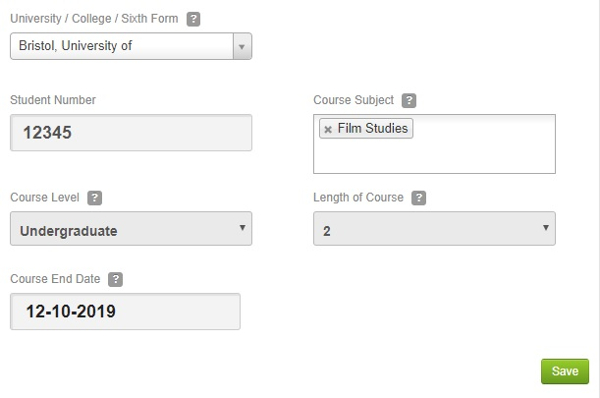
Why do we need these details? Well, our Student Activation Team will use these details to confirm that you are actually in full-time education and use these to set your expiry date. Our Casting Team may also perform searches on this information if they are asked for real students to talk about their experience or someone with skills your course may provide.
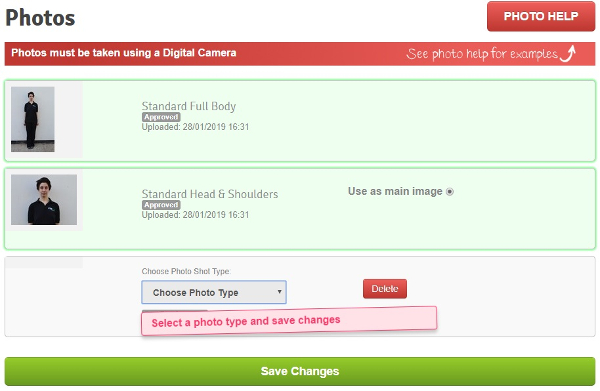
Step 2 – A Picture is Worth a Thousand Words
You must have 2 approved photos uploaded to your profile to get yourself activated. But How do you get them right? In our Blog Perfect Photos First Time, you can find some tips on using the right background and what we need to see in these pictures.
Quick Tips
Clothes – By picking simple, comfortable, fitting clothing you get to show us you quickly and effectively. A simple stylish outfit can fit into most scenes easily so make it easy for our Casting Teams and Production Staff to imagine you in their scene! Something as simple as a plain T-shirt with smart jeans or a nice dress would be perfect, avoid logos and bright clashing colours and patterns to keep you as the main focus of the image.
Hair – If your hair is long, wear it loose and bring it forward over your shoulders so we can see its full length. If your hair is naturally curly, avoid the temptation to flatten it down. Our Casting Team and Production’s Hair and Make-Up Teams will always want to see how long your hair is, as well as its style and colour. Using the free image sharing site Pexels, we have found some lovely examples to give you some inspiration:

Jewellery and Accessories – If you wear it, again keep it simple! A nice ring, necklace or watch may complete your outfit or draw attention to your favourite features. But a necklace like a Tudor Ruff or a brooch, as big as a shield will look odd, no matter how stylish you are, and draw the attention away from your face. We don’t want that!
Layered Outfits – Avoid layers for these pictures, coats, hats and scarves will hide your features or distort your body shape.
Plain Backgrounds – Look for a solid coloured wall in a neutral colour, it doesn’t have to be white, just as plain as possible. Bricks, smooth concrete or plaster are also great. Avoid bold wallpapers, reflective surfaces, door frames, graffiti etc.

If you are reading this and thinking “Oh No, that’s not the picture I uploaded” you can remove them by clicking the photo type and changing it back to ‘Select Photo Type’. This will offer you the ‘Delete’ button. This will only work for photos that have not yet been approved or rejected.
Step 3 – Got The Right to Work
As with all employment here in the UK, as your agency, we need to see your ‘right to work’ documentation.
On the ‘My Documents’ page, start by selecting the correct citizenship option from the top menu. By selecting this, you will be shown a list of the documents we can use to verify your right to work. This means we can confidently put your forward for work and limit payment issues further down the line.
Click here for more details on Right to Work.
Step 4 – I’m A Student and I Can Prove It
And we have arrived at the last step, your Student Proof! What do we need?
1 – A headed, stamped and signed letter from your college or university showing your Student Status, Course, Start and End Date.
Or
2 – Your Student ID card showing your college or university name, course and end date.

We need this to be able to end your listing at the right time. Simply upload this on the ‘My Documents’ page of your profile as ‘Proof of Student Eligibility’ or ‘Student Card’ depending on the document you upload. Remember without this you will not get your Free listing and will be subject to our normal listing fees if you secure a role before your profile is active, so get this uploaded as soon as possible.
Once you have completed these 4 steps our Student Activation Team will review your profile and allocate you your free membership! We hope this helps and we look forward to working with you soon!